#Create a Backup Repository
Explore tagged Tumblr posts
Visit Tumblr Blog
Explore Tumblr blogs with no restrictions, modern design and the best experience.
Last Seen Tumblr Blogs


Fun Fact
Post activity is at the highest at 4:00 pm EDT; notes peak at 10:00 pm EDT.
Text
Achieve 3-2-1 rule with SOBR on Synology or OOTBI and Wasabi
Veeam’s Scale-Out Backup Repository (SOBR) can be used to implement the 3-2-1 backup rule. The 3-2-1 backup rule recommends having three copies of your data, stored on two different types of media, with one copy kept off-site. SOBR is built upon collections of individual repositories as we will see very shortly. In this article, I will demonstrate how you can Achieve 3-2-1 rule with SOBR on…
#3-2-1 Backup Rule#3-2-1-1-0 Rule#Archive Tier#Backup Repository#Backup Target#Capacity Tier#Create a Backup Repository#Create a Bucket on Wasabi#Create an Access Key#Direct to Object Storage Backups#Implement 3-2-1 Backup with SOBR#Performance Tier#Run Tiering Jon Now#Scale-out Backup Repository#SOBR Archive Tier#SOBR Extents#SOBR Offloads#Start Veeam SOBR Offload Job Manually#Storage Bucket#Use a SOBR with Veeam Backup & Replication
0 notes
Note
How do you make UI recolors? I wanted to make my own but I don't know how to get started.
How to make your own UI recolours for The Sims 3
note:
this guide is for the Windows PC, Steam Version of The Sims 3, because that is what i have
dino_rex's thread:
this thread is what got me started
you can download the starter packs on the attached files of this post
i don't use this starter pack anymore because it's limited and didn't include what i wanted to change
i would recommend that you use the other options below...
start small first:
i wrote a similar post on creating custom loading screens here, so this post will be VERY similar to that!
please start with that tutorial first to get familiarized with the whole editing process, then move on...
now, to do it yourself:
first, navigate to where your TS3 game is installed:
Steam -- Program Files (x86)\Steam\steamapps\common\The Sims 3\
DVD 34 bit-- Program Files\Electronic Arts\The Sims 3\
DVD 64 bit-- Program Files (x86)\Electronic Arts\The Sims 3\
Origin 34 bit -- Program Files\Origin Games\The Sims 3\
Origin 64 bit-- Program Files (x86)\Origin Games\The Sims 3\
// idk the path for non-Windows installations //
NOT THIS -- Documents\Electronic Arts\The Sims 3
navigate to:
\GameData\Shared\Packages\
and the packages you are looking for are:
FullBuild0.package
DeltaBuild0.package
for BOTH packages, do this:
Open in S3PE
Resource
Select all
Export
To file...
Choose a folder to export to (An example: have a primary YourProjectName folder, with 2 folders within it: Originals and Edited. Within Originals is 2 folders: FullBuild and DeltaBuild)
Export the files to the appropriate folder
now that you've exported the Originals, time to make your edits:
Navigate to YourProjectName folder
COPY the original file that you want to edit (from the Originals folder)
Place it in the Edited folder
Edit these files with your preferred image editor
Open S3PE and have your File Explorer up
Select the images you've edited in your File Explorer (Ctrl+A to select all)
Drag to S3PE
Popup window: Import
Wait until it's complete
Hit X to close S3PE
Save? Yes.
Choose a name for your package
Save
Copy this package to your Mods folder
Start your game. Changes should appear.
Repeat until you are satisfied with your changes
my version
my 3 UI recolour projects (Sakura, Wisteria, Celeste) are based on this starter template repository on GitHub. don't use this template because it is stylized / customized for MY OWN three projects, and may NOT be what you want. however, you can copy the folder structure and look up what files to change for your own project (as inspiration).
i highly recommend that you use GitHub to BACKUP and TRACK your changes (or another version control software)
happy editing!
6 notes
·
View notes
Text
A beginners guide to GIT: Part 4 - How to use GIT as 1 person
Table of content: Part 1: What is GIT? Why should I care?
Part 2: Definitions of terms and concepts
Part 3: How to learn GIT after (or instead of ) this guide.
Part 4: How to use GIT as 1 person
Part 5: How to use GIT as a group.
When it comes to not getting in each other's way, working alone is the simplest (It has a lot of other drawbacks). This is the simplest way to use GIT. You can do it with an external repository as a backup or just locally on your computer. It depends on how important your project is. If your laptop crashes tomorrow, which projects would you have a really hard time losing? Better to have an external backup for that. Github is often used for this (Maybe less now that Github makes machine learning AI’s, and so ARE stealing your code to train their AI on.) but you can also use Bitbucket (Which... may also steal your code...) and there are many many others out there. GIT is often used in certain patterns, called “workflows”. These have you working in more or less rigid ways to make it simple to work together. But since you are working alone, you do not risk others changing your code while you are working, so you can do it the simplest way :D
I will be doing a step by step guide that you can follow along. I will be doing it on a completely empty project and making a tiiiiiny program in C. This is because it is super simple. You do NOT have to know C to follow. You can also follow the steps with your own already existing project.
I PROMISE you, GIT cannot hurt you. Worst case scenario is that you fiddle around and break the repository part. (Meaning the files in the .git folder). But your files will always be safe.
(If you do not have git installed, check out part 3 for that)
First, I make a folder, navigate my shell into it, and call git init:
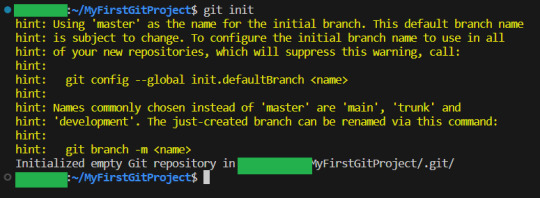
By the way, you can get used to GIT messages like this that tell you all your options, and explain what GIT has done for you. GIT is very good about giving you as much help and info as possible,
Now I will teach you the most important command in GIT.
It is more important than any other. Ready?
git status

This makes GIT tell you what git thinks is happening right now. What issues there are and what files are tracked, untracked or have been changed. Use this command often, especially while you are new to GIT, run it after every other command. It is how you learn what GIT is doing and thinking :3
Since our repo is empty it tells you what branch you are on (master. The only branch we will need since we are working alone)
and that you have not made any commits.
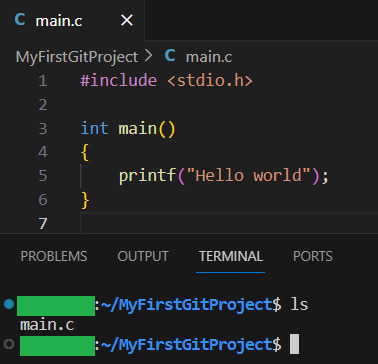
It also tells you the commands git think you will want to use on files. Since our repository is empty, it tells us to create some files, and then how to add them :3 So let's do that:
I have added my tiny program, as you can see:
Now let us see what GIT thinks we did:
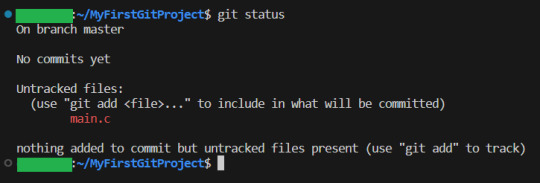
Now, since there have been changes, git shows us them.
Files can be untracked tracked and not changed (In which case, git status does not show them) tracked and changed.
Right now, main.c is untracket. Which basically means GIT have no idea about this file, other than it is in the folder.
Ok, let us commit(save) the file. GIT tells us this is done with git add <File> . So we will write git add main.c
Then we use git status again to see what happened git status
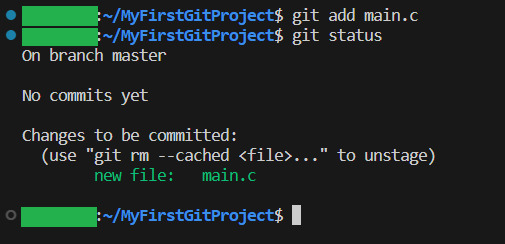
And yeah, our file is now ready to be committed. So lets do it! git commit -m “My first commit!”
The “-m” option is to write the git update explanation directly in the console instead of using an external program to do it. Done You have now committed your code! It is now saved!
git status shows that everything in the working tree is as it was last time we committed (Duh. We JUST committed)
I will now make some changes to the main file:

Git status shows us main.c was changed...but what if we wanted to know what was changed in more detail? How will we get status to do that for us? Let us find out! git help status
git then shows the help page for status And there we can see this part:

So if we write status with 2 -v arguments, we get all the details. Let us try:
And look! It shows us EXACTLY what lines were changed! I stage the changes and commit:
And you have now learning enough about GIT to use it.. You now have all your work saved, in different commits. If you ever want to know all the commits you have made, write git log:

And if you want to know what a specific commit did, you copy the name of the commit, and write git show:

Now, everytime you want to save your work, you
1: Write/change the files you want
2: Add the files you want as part of this commit
3: make the commit These three steps are your workflow.
If you have a remote repository, then you add them steps
4: push to remote repository
To do this step, you can actually just write
git push
If you have set up a remote repository, then it just works. If you have not, then git will tell you what to do Whichever remote repository you use will tell you if you need to do other steps, like setting up passwords or ssh keys. They will also tell you how to set up the remote repository (That is not a GIT thing, that is a bitbucket or a github thing, so refer to whichever of those sites you want to use) And that is all! Every time you commit, your project is saved (it is smart to commit often, but usually only commit when your project can be compiled.) And whether you use a remote repository or not, you now have a fully valid GIT repository, and all the git tricks can be used on your project!
39 notes
·
View notes
Text
WordPress Mastery: A Complete Guide for Novices and Experts
Welcome back to our blog! We're delving further into WordPress today, the industry-leading content management system that has revolutionized website development and administration. This tutorial will give you the fundamental knowledge, skills, and insights you need to become an expert WordPress user, regardless of whether you're just getting started or want to improve your current website.
What Is Unique About WordPress? WordPress is a complete content management system (CMS) that supports a wide variety of websites, from huge business sites to personal blogs. The following are some salient characteristics that distinguish WordPress:
1. Open Source & Free WordPress is open-source software, meaning it is free to use and modify. This accessibility has resulted in a thriving community of developers and users who contribute to its ongoing enhancement. 2. Flexibility and Scalability. Whether you run a small blog or a huge e-commerce site, WordPress can scale to meet your demands. You can begin simple and extend your site as your business expands, adding new features and functionalities along the way. 3. Extensive plugin ecosystem. With over 58,000 plugins accessible, you can simply add new features to your website without requiring any technical skills. From SEO tools to social network integrations, there's a plugin for practically every requirement.
4. Mobile responsiveness. Most WordPress themes are built to be mobile-responsive, so your site will look amazing on any device. This is especially important in today's mobile-first environment, when smartphones and tablets account for a considerable amount of web traffic. To set up your WordPress site, start by selecting a hosting provider.
Choosing a reputable hosting company is critical for your website's performance. Look for WordPress-specific providers like Bluehost, SiteGround, or Kinsta, which provide optimized conditions for WordPress blogs.
Step 2: Installing WordPressYou can install WordPress after you've acquired your domain name and hosting. Most hosting companies include a one-click installation option, making it simple to get started. Step 3: Choose a theme Your site's design and feel are determined by its theme. To choose a design that fits your brand, look through the WordPress theme repository or premium theme marketplaces like as ThemeForest. Step 4: Customise Your Website After you've decided on a theme, tweak it to meet your requirements. To change the colors, fonts, and layouts, use the WordPress Customizer. You may also add widgets to your sidebar or footer to extend its usefulness.
Step 5: Add the necessary plugins. Install the following important plugins to improve the essential plugins:
Elementor: A powerful page builder for creating custom layouts.
Akismet: A spam protection plugin to keep your comments section clean.
WP Super Cache: A caching plugin to improve your site’s loading speed.
UpdraftPlus: For easy backups of your site. Plan Your Content Create a content calendar to help you arrange your themes and posting schedule. Headings and Subheadings: To increase readability and SEO, divide your text into sections with headings (H1, H2, H3). Conclusion WordPress is a powerful platform that can help you construct a beautiful and functioning website, regardless of your technical knowledge. Understanding its features and capabilities will allow you to maximize the platform's potential for achieving your online objectives. Whether you're a blogger, a business owner, or a creative professional, WordPress provides the freedom and resources you need to thrive. Stay tuned for more tips, tutorials, and insights in future postings, and happy WordPressing!

2 notes
·
View notes
Text
Buy Old GitHub Account
What Is GitHub Account?
A GitHub account is an essential tool for developers and anyone involved in software development or collaborative projects. Old GitHub is a platform where you can host and manage your code repositories, collaborate with others, and track changes to your code over time. Old GitHub provides features such as version control using Git, issue tracking, project management tools, and the ability to review and discuss code changes through pull requests and code reviews.
Having an Old GitHub account allows you to contribute to open-source projects, showcase your own projects, and collaborate with other developers on different projects. Old GitHub Account is widely used in the software development community and serves as a hub for sharing and collaborating on code.
Contact Telegram: @usapvaservice WhatsApp: +60-01163738310 Skype: usapvaserviceEmail: [email protected]

What is the use of GitHub account?
An Old GitHub account serves a variety of purposes, primarily revolving around collaboration between software development projects, version control, and code management. Here are some of the main uses:
Version control: Old GitHub is built on top of Git, a distributed version control method. With GitHub, developers can track changes to their codebase over time, roll back to previous versions when needed, and collaborate with others on the same codebase simultaneously.
Collaboration: Old GitHub Account provides a platform for teams to collaborate on software projects. Multiple developers can work on the same codebase, make changes, and propose changes through pull requests. It facilitates team coordination and increases productivity.
Code Hosting: GitHub hosts the Git repository, which allows developers to store their code in the cloud. This ensures that the code is accessible from anywhere with an Internet connection and provides a backup in case of local machine failure.
Issue Tracking: The Old GitHub Account includes issue-tracking features, allowing users to report bugs, propose features, and discuss ideas related to a project. It helps organize tasks, prioritize tasks and keep track of project progress.
Documentation: Aged GitHub Account provides tools for creating and hosting documentation for software projects. Developers can write README files, wikis, and other documentation directly into their repositories, making it easier for contributors and users to understand how the project works.
Community Engagement: GitHub Account is a hub for open source projects, enabling developers to contribute to projects maintained by others and discover new projects to work on. It fosters a vibrant community where developers can learn from each other, share code, and collaborate on shared interests.
Overall, a legacy GitHub account is essential for developers and teams looking to efficiently collaborate on software projects, whether for open-source contributions, personal projects, or work-related endeavors.
#social media#internet#social#github#1950s#Buy Old GitHub Account#old github account#Old GitHub#social marketing#web development#search engine optimization#social networks
2 notes
·
View notes
Text
Ansible Collections: Extending Ansible’s Capabilities
Ansible is a powerful automation tool used for configuration management, application deployment, and task automation. One of the key features that enhances its flexibility and extensibility is the concept of Ansible Collections. In this blog post, we'll explore what Ansible Collections are, how to create and use them, and look at some popular collections and their use cases.
Introduction to Ansible Collections
Ansible Collections are a way to package and distribute Ansible content. This content can include playbooks, roles, modules, plugins, and more. Collections allow users to organize their Ansible content and share it more easily, making it simpler to maintain and reuse.
Key Features of Ansible Collections:
Modularity: Collections break down Ansible content into modular components that can be independently developed, tested, and maintained.
Distribution: Collections can be distributed via Ansible Galaxy or private repositories, enabling easy sharing within teams or the wider Ansible community.
Versioning: Collections support versioning, allowing users to specify and depend on specific versions of a collection. How to Create and Use Collections in Your Projects
Creating and using Ansible Collections involves a few key steps. Here’s a guide to get you started:
1. Setting Up Your Collection
To create a new collection, you can use the ansible-galaxy command-line tool:
ansible-galaxy collection init my_namespace.my_collection
This command sets up a basic directory structure for your collection:
my_namespace/
└── my_collection/
├── docs/
├── plugins/
│ ├── modules/
│ ├── inventory/
│ └── ...
├── roles/
├── playbooks/
├── README.md
└── galaxy.yml
2. Adding Content to Your Collection
Populate your collection with the necessary content. For example, you can add roles, modules, and plugins under the respective directories. Update the galaxy.yml file with metadata about your collection.
3. Building and Publishing Your Collection
Once your collection is ready, you can build it using the following command:
ansible-galaxy collection build
This command creates a tarball of your collection, which you can then publish to Ansible Galaxy or a private repository:
ansible-galaxy collection publish my_namespace-my_collection-1.0.0.tar.gz
4. Using Collections in Your Projects
To use a collection in your Ansible project, specify it in your requirements.yml file:
collections:
- name: my_namespace.my_collection
version: 1.0.0
Then, install the collection using:
ansible-galaxy collection install -r requirements.yml
You can now use the content from the collection in your playbooks:--- - name: Example Playbook hosts: localhost tasks: - name: Use a module from the collection my_namespace.my_collection.my_module: param: value
Popular Collections and Their Use Cases
Here are some popular Ansible Collections and how they can be used:
1. community.general
Description: A collection of modules, plugins, and roles that are not tied to any specific provider or technology.
Use Cases: General-purpose tasks like file manipulation, network configuration, and user management.
2. amazon.aws
Description: Provides modules and plugins for managing AWS resources.
Use Cases: Automating AWS infrastructure, such as EC2 instances, S3 buckets, and RDS databases.
3. ansible.posix
Description: A collection of modules for managing POSIX systems.
Use Cases: Tasks specific to Unix-like systems, such as managing users, groups, and file systems.
4. cisco.ios
Description: Contains modules and plugins for automating Cisco IOS devices.
Use Cases: Network automation for Cisco routers and switches, including configuration management and backup.
5. kubernetes.core
Description: Provides modules for managing Kubernetes resources.
Use Cases: Deploying and managing Kubernetes applications, services, and configurations.
Conclusion
Ansible Collections significantly enhance the modularity, distribution, and reusability of Ansible content. By understanding how to create and use collections, you can streamline your automation workflows and share your work with others more effectively. Explore popular collections to leverage existing solutions and extend Ansible’s capabilities in your projects.
For more details click www.qcsdclabs.com
#redhatcourses#information technology#linux#containerorchestration#container#kubernetes#containersecurity#docker#dockerswarm#aws
2 notes
·
View notes
Text
10 Essential WordPress Plugins Every Business Website Should Have in 2025

Building a website with WordPress gives you a huge advantage: plugins. These handy tools extend the functionality of your site — allowing you to add features without writing a single line of code.
But with over 60,000 plugins available in the WordPress repository, choosing the right ones can be overwhelming. Whether you're setting up a local business site or a full-fledged online store, this guide will help you select the most essential plugins to make your site faster, more secure, and easier to manage.
Need help installing and configuring plugins? A reliable WordPress Development Company in Udaipur can assist you in customizing your site professionally.
What Are WordPress Plugins?
Plugins are like apps for your website. They allow you to:
Add contact forms
Improve SEO
Secure your site
Create backups
Sell products online
Track website analytics
Instead of coding features manually, you install plugins that handle the job.
1. Yoast SEO – Optimize for Search Engines
Yoast SEO is the most popular SEO plugin and a must-have for any business website.
Key Benefits:
Add custom meta titles and descriptions
Generate XML sitemaps
Get real-time SEO analysis for content
Improve click-through rates with schema markup
Yoast helps your website appear higher on Google and ensures that every blog or page is optimized for search engines.
2. WPForms – Build Contact and Inquiry Forms
Want customers to contact you? Use WPForms to easily create:
Contact forms
Booking request forms
Feedback and quote request forms
Its drag-and-drop builder is beginner-friendly, and you can integrate email notifications, spam protection, and CRM tools easily.
3. WooCommerce – Set Up Online Selling
For product-based businesses, WooCommerce turns your website into a complete e-commerce store.
Features Include:
Product listings with filters
Secure payment gateways (Razorpay, Stripe, PayPal)
Inventory and shipping management
Discount codes and tax settings
WooCommerce powers over 25% of all online stores — and it’s free!
4. Wordfence Security – Protect Against Hacks
Security is critical, especially if you collect user data or accept payments. Wordfence provides real-time protection by:
Blocking suspicious login attempts
Scanning files for malware
Enabling 2-factor authentication
Providing firewall protection
It keeps your WordPress site safe from bots, brute-force attacks, and vulnerabilities.
5. UpdraftPlus – Automate Backups
Imagine your website crashing or being hacked — and losing everything. UpdraftPlus ensures that never happens.
With it, you can:
Schedule automatic daily/weekly backups
Store backups on cloud services (Google Drive, Dropbox)
Restore your site in one click
It’s a peace-of-mind plugin every business should have.
6. LiteSpeed Cache – Speed Up Your Website
Website speed matters. It affects both user experience and SEO rankings. LiteSpeed Cache boosts your website's speed by:
Caching pages and files
Optimizing images and CSS/JS files
Integrating with CDN services
This ensures your visitors stay longer — and Google ranks you higher.
7. MonsterInsights – Google Analytics Made Easy
Want to know how visitors find and use your website? MonsterInsights helps you integrate Google Analytics and gives insights right inside your WordPress dashboard.
You can track:
Pageviews
Bounce rate
Referral traffic
E-commerce conversions
It’s great for making data-driven decisions to improve performance.
8. Smush – Image Compression Without Quality Loss
Large images slow down your site. Smush automatically compresses and resizes images without losing quality, improving your load times.
Key features:
Lazy loading
Bulk image optimization
Auto-resize on upload
Faster images = better user experience.
9. WPML – Make Your Site Multilingual
If your business serves a multilingual audience, WPML lets you:
Translate content into multiple languages
Add language switchers
Maintain SEO for each version
It’s ideal for tourism businesses, international brands, or service providers expanding beyond one region.
10. Redirection – Manage Broken Links and Redirects
Broken links hurt your SEO and frustrate users. Redirection helps you:
Set up 301 redirects
Track 404 errors
Improve site structure over time
It’s a lightweight but powerful tool for keeping your site user- and SEO-friendly.
How to Avoid Plugin Overload
Too many plugins can slow down your site and cause conflicts. Here’s how to manage them smartly:
Only install well-rated, updated plugins
Avoid multiple plugins that do the same job
Deactivate and delete unused ones
Monitor speed and functionality after adding new plugins
Pro tip: Use a staging site to test new plugins before applying them on your live site.
When to Hire a WordPress Plugin Expert
Plugins are easy to install, but configuration, compatibility, and performance tuning often require a professional’s touch.
A seasoned web design company in Udaipur can:
Recommend the right plugin stack based on your industry
Customize plugins without bloating your site
Optimize speed, security, and backups
Monitor plugin health over time
This ensures your business website is both functional and future-ready.
Final Thoughts: Plugins Build Power Into Your Website
WordPress plugins are what make the platform so flexible and scalable. By choosing the right set of tools, your business website can:
Generate leads
Sell products
Rank higher on search engines
Stay fast and secure
Offer great user experience
But with great power comes great responsibility — choose wisely, update regularly, and don’t hesitate to get expert help.
0 notes
Link
[ad_1] Repository backups are a critical component of any robust disaster recovery strategy. However, as repositories grow in size, the process of creating reliable backups becomes increasingly challenging. Our own Rails repository was taking 48 hours to back up — forcing impossible choices between backup frequency and system performance. We wanted to tackle this issue for our customers and for our own users internally. Ultimately, we traced the issue to a 15-year-old Git function with O(N²) complexity and fixed it with an algorithmic change, reducing backup times exponentially. The result: lower costs, reduced risk, and backup strategies that actually scale with your codebase. This turned out to be a Git scalability issue that affects anyone with large repositories. Here's how we tracked it down and fixed it. Backup at scale First, let's look at the problem. As organizations scale their repositories and backups grow more complex, here are some of the challenges they can face: Time-prohibitive backups: For very large repositories, creating a repository backup could take several hours, which can hinder the ability to schedule regular backups. Resource intensity: Extended backup processes can consume substantial server resources, potentially impacting other operations. Backup windows: Finding adequate maintenance windows for such lengthy processes can be difficult for teams running 24/7 operations. Increased failure risk: Long-running processes are more susceptible to interruptions from network issues, server restarts, and system errors, which can force teams to restart the entire very long backup process from scratch. Race conditions: Because it takes a long time to create a backup, the repository might have changed a lot during the process, potentially creating an invalid backup or interrupting the backup because objects are no longer available. These challenges can lead to compromising on backup frequency or completeness – an unacceptable trade-off when it comes to data protection. Extended backup windows can force customers into workarounds. Some might adopt external tooling, while others might reduce backup frequency, resulting in potential inconsistent data protection strategies across organizations. Now, let's dig into how we identified a performance bottleneck, found a resolution, and deployed it to help cut backup times. The technical challenge GitLab's repository backup functionality relies on the git bundle create command, which captures a complete snapshot of a repository, including all objects and references like branches and tags. This bundle serves as a restoration point for recreating the repository in its exact state. However, the implementation of the command suffered from poor scalability related to reference count, creating a performance bottleneck. As repositories accumulated more references, processing time increased exponentially. In our largest repositories containing millions of references, backup operations could extend beyond 48 hours. Root cause analysis To identify the root cause of this performance bottleneck, we analyzed a flame graph of the command during execution. A flame graph displays the execution path of a command through its stack trace. Each bar corresponds to a function in the code, with the bar's width indicating how much time the command spent executing within that particular function. When examining the flame graph of git bundle create running on a repository with 10,000 references, approximately 80% of the execution time is consumed by the object_array_remove_duplicates() function. This function was introduced to Git in the commit b2a6d1c686 (bundle: allow the same ref to be given more than once, 2009-01-17). To understand this change, it's important to know that git bundle create allows users to specify which references to include in the bundle. For complete repository bundles, the --all flag packages all references. The commit addressed a problem where users providing duplicate references through the command line – such as git bundle create main.bundle main main - would create a bundle without properly handling the duplicated main reference. Unbundling this bundle in a Git repository would break, because it tries to write the same ref twice. The code to avoid duplication uses nested for loops that iterate through all references to identify duplicates. This O(N²) algorithm becomes a significant performance bottleneck in repositories with large reference counts, consuming substantial processing time. The fix: From O(N²) to efficient mapping To resolve this performance issue, we contributed an upstream fix to Git that replaces the nested loops with a map data structure. Each reference is added to the map, which automatically ensures only a single copy of each reference is retained for processing. This change dramatically enhances the performance of git bundle create and enables much better scalability in repositories with large reference counts. Benchmark testing on a repository with 10,000 references demonstrates a 6x performance improvement. Benchmark 1: bundle (refcount = 100000, revision = master) Time (mean ± σ): 14.653 s ± 0.203 s [User: 13.940 s, System: 0.762 s] Range (min … max): 14.237 s … 14.920 s 10 runs Benchmark 2: bundle (refcount = 100000, revision = HEAD) Time (mean ± σ): 2.394 s ± 0.023 s [User: 1.684 s, System: 0.798 s] Range (min … max): 2.364 s … 2.425 s 10 runs Summary bundle (refcount = 100000, revision = HEAD) ran 6.12 ± 0.10 times faster than bundle (refcount = 100000, revision = master) The patch was accepted and merged into upstream Git. At GitLab, we backported this fix to ensure our customers could benefit immediately, without waiting for the next Git release. The result: Dramatically decreased backup times The performance gains from this improvement have been nothing short of transformative: From 48 hours to 41 minutes: Creating a backup of our largest repository (gitlab-org/gitlab) now takes just 1.4% of the original time. Consistent performance: The improvement scales reliably across repository sizes. Resource efficiency: We significantly reduced server load during backup operations. Broader applicability: While backup creation sees the most dramatic improvement, all bundle-based operations that operate on many references benefit. What this means for GitLab customers For GitLab customers, this enhancement delivers immediate and tangible benefits on how organizations approach repository backup and disaster recovery planning: Transformed backup strategies Enterprise teams can establish comprehensive nightly schedules without impacting development workflows or requiring extensive backup windows. Backups can now run seamlessly in the background during nightly schedules, instead of needing to be dedicated and lengthy. Enhanced business continuity With backup times reduced from days to minutes, organizations significantly minimize their recovery point objectives (RPO). This translates to reduced business risk – in a disaster scenario, you're potentially recovering hours of work instead of days. Reduced operational overhead Less server resource consumption and shorter maintenance windows. Shorter backup windows mean reduced compute costs, especially in cloud environments, where extended processing time translates directly to higher bills. Future-proofed infrastructure Growing repositories no longer force difficult choices between backup frequency and system performance. As your codebase expands, your backup strategy can scale seamlessly alongside it Organizations can now implement more robust backup strategies without compromising on performance or completeness. What was once a challenging trade-off has become a straightforward operational practice. Starting with the GitLab 18.0 release, all GitLab customers regardless of their license tier can already fully take advantage of these improvements for their backup strategy and execution. There is no further change in configuration required. What's next This breakthrough is part of our ongoing commitment to scalable, enterprise-grade Git infrastructure. While the improvement of 48 hours to 41 minutes for backup creation time represents a significant milestone, we continue to identify and address performance bottlenecks throughout our stack. We're particularly proud that this enhancement was contributed upstream to the Git project, benefiting not just GitLab users but the broader Git community. This collaborative approach to development ensures that improvements are thoroughly reviewed, widely tested, and available to all. Deep infrastructure work like this is how we approach performance at GitLab. Join the GitLab 18 virtual launch event to see what other fundamental improvements we're shipping. Register today! [ad_2] Source link
0 notes
Text
Top 10 Essential Plugins Every WordPress Developer Should Know
WordPress has evolved into one of the most powerful and flexible content management systems available today. With over 40% of the web powered by WordPress, developers have an incredible opportunity to build robust, high-performing websites tailored to any niche or industry.
One of the key reasons behind WordPress's popularity is its vast plugin ecosystem. Plugins enhance functionality, streamline development, improve security, and boost performance—saving developers time and effort. But with over 60,000 plugins in the WordPress repository, choosing the right ones can be overwhelming.
To help you cut through the noise, here are 10 essential WordPress plugins every developer should know. Whether you’re building custom themes, working on client projects, or managing your own website, these tools are must-haves in your toolkit.
1. Advanced Custom Fields (ACF)
Purpose: Add and manage custom fields
Advanced Custom Fields is a staple for WordPress developers. It allows you to add custom fields to posts, pages, users, and more—giving you complete control over content structure.
Whether you're building a real estate site with custom listings or a portfolio with dynamic content types, ACF simplifies data entry and enhances your site's flexibility.
Why it’s essential:
User-friendly interface for clients
Supports complex field types (repeaters, galleries, flexible content)
Saves development time
2. Yoast SEO
Purpose: Optimize site for search engines
While it’s widely known among content creators, Yoast SEO is also an important tool for developers. It ensures that every page and post is properly optimized with SEO best practices in mind.
For developers, Yoast offers customizable breadcrumbs, schema integration, and control over robots.txt and sitemaps.
Why it’s essential:
Enhances search visibility
Adds structured data
Developer-friendly filters and actions
3. WP Rocket
Purpose: Performance optimization
Speed is a ranking factor and a user experience booster. WP Rocket is a powerful caching plugin that makes WordPress sites load faster with minimal configuration.
It handles page caching, browser caching, lazy loading, database cleanup, and CDN integration—all in one.
Why it’s essential:
Boosts Core Web Vitals
Developer hooks for customization
Compatible with eCommerce and multilingual sites
4. Query Monitor
Purpose: Debugging and performance analysis
Query Monitor is a must-have for diagnosing issues in WordPress development. It tracks database queries, PHP errors, hooks, REST API calls, and much more.
If your site is running slowly or you’re dealing with unexpected behavior, Query Monitor helps pinpoint the problem quickly.
Why it’s essential:
Real-time debugging
Works with themes and plugins
Identifies performance bottlenecks
5. Custom Post Type UI
Purpose: Create and manage custom post types and taxonomies
WordPress development often involves creating custom content structures beyond posts and pages. Custom Post Type UI provides an easy interface for registering custom post types and taxonomies without touching code.
It’s perfect for speeding up development and can be used alongside ACF for full control over content models.
Why it’s essential:
No-code setup for post types
Export functionality for use in themes/plugins
Saves hours of manual coding
6. Duplicator
Purpose: Site migration and backup
Duplicator makes it easy to clone, move, or back up a WordPress site. Whether you're moving from staging to production or delivering a completed project to a client, this plugin simplifies the process.
It packages your site files and database into a single archive for easy deployment.
Why it’s essential:
Hassle-free migrations
Great for creating boilerplate templates
No need for manual database edits
7. WP All Import
Purpose: Import data into WordPress
When working with client data, bulk content, or WooCommerce products, WP All Import is an invaluable tool. It allows you to import data from XML or CSV files into any post type.
It integrates seamlessly with ACF, WooCommerce, and custom taxonomies—giving developers control over how data is mapped and displayed.
Why it’s essential:
Handles large datasets
Flexible import options
Developer-friendly with PHP functions
8. User Role Editor
Purpose: Manage and customize user roles and capabilities
In complex WordPress sites, controlling access levels is crucial. User Role Editor lets you fine-tune permissions for different user roles, or even create entirely new roles tailored to your project.
This is particularly helpful for membership sites, eLearning platforms, and client dashboards.
Why it’s essential:
Easy UI for managing capabilities
Useful for multisite setups
Secure role management
9. Regenerate Thumbnails
Purpose: Recreate image sizes
When changing themes or modifying image dimensions in your functions file, WordPress doesn’t automatically apply those changes to existing media. Regenerate Thumbnails lets you update image sizes in bulk.
This ensures consistency in your layouts and prevents layout issues.
Why it’s essential:
Saves hours of manual editing
CLI support for automation
Works well in dev and production environments
10. Wordfence Security
Purpose: WordPress site security
Security should never be an afterthought. Wordfence offers real-time threat defense, malware scanning, login protection, and firewall features to keep your WordPress sites safe.
While developers might also work with server-level tools, Wordfence provides an easy layer of protection that’s client-friendly and highly effective.
Why it’s essential:
Real-time firewall and malware scanning
Brute force protection
Detailed traffic and threat reports
Final Thoughts
The WordPress plugin ecosystem is vast, and while there’s no one-size-fits-all solution, these ten plugins provide a solid foundation for any WordPress developer. They help speed up workflows, improve site performance, enhance SEO, secure data, and streamline debugging.
As a developer, knowing when and how to use these tools—and when to avoid unnecessary plugins—is part of mastering WordPress. Choose wisely, keep your stack lean, and always test for compatibility in your development environment.
Are there any plugins you can’t live without? Let us know in the comments!
0 notes
Text
Setup iSCSI Target and Storage LUN on Synology DS923+ for VBR
We discussed using HyperV host with a local disk as a VBR Repository (not recommended). The recommended approach is to use a different Windows Server as a backup repo. What you could also do is use a directly attached storage as a backup repository on the Windows Server such as iSCSI/FC SAN LUN etc. In this article, we shall discuss how to setup iSCSI Target and Storage LUN on Synology DS923+ for…

View On WordPress
#Add a New Repository#Backup Repository#Bring Disk Online#Create a Backup Repository#File Shares Backup#Initialize disk#iSCSI repository#Microsoft Windows#Restore File Share#SAN Manager#Synology#Windows#Windows Server 2012#Windows Server 2016#Windows Server 2022
0 notes
Text
Powering the Future Sustainably: How LOHUM is Closing the Battery Loop with Repurposing and Reverse Logistics
In the fast-evolving era of electrified mobility, lithium-ion batteries have become the lifeblood of innovation. From scooters to electric cars, buses, commercial trucks, trains, and even aircraft, Li-ion batteries are driving the global transition towards cleaner, smarter transportation. But while this technological shift helps reduce emissions, it also brings a new kind of challenge: What happens to these batteries once they reach the end of their first life?
With over 2 million metric tonnes of used lithium-ion batteries projected to be retired annually by 2030, the world is facing a critical inflection point. The rise in electric vehicles (EVs), solar energy storage, and consumer electronics means that an unprecedented volume of used batteries will soon require responsible handling. At LOHUM, we see this as a defining opportunity—to not just manage battery waste, but to mine value from it. Our mission is to power the world sustainably through world-class battery repurposing and recycling solutions.
A Circular Opportunity: Rethinking Battery End-of-Life
Today, less than 5% of lithium-ion batteries are recycled globally. Much of the battery waste ends up in landfills or is stored indefinitely, awaiting infrastructure improvements or economic justification for recycling. Yet lithium-ion batteries are anything but waste—they are repositories of critical materials like lithium, cobalt, and nickel, and represent a latent opportunity for resource recovery and circular manufacturing.
According to analysts, more than half a million EV battery packs could be retired each year by the end of this decade. That’s not a problem—it’s a reservoir of potential. With Li-ion Battery Repurposing Technology, LOHUM is unlocking this potential, transforming retired batteries into high-performance, second-life energy storage solutions.
Repurposing, Not Just Recycling: The LOHUM Way
Recycling batteries is essential, but it's only part of the answer. At LOHUM, we believe in maximizing the usable life of every battery before it reaches the recycling stage. Our proprietary Li-ion Battery Repurposing Technology enables us to identify, extract, and refurbish healthy battery modules from retired EV battery packs. These refurbished modules are then used in applications such as renewable energy storage, backup systems, telecom towers, and grid balancing.
One battery, many lives—that’s the circular principle we live by.
Studies show that EV batteries typically reach end-of-life when they lose around 20% of their original capacity. But even with 80% capacity, these batteries can serve for an additional 6 to 10 years in stationary applications. That’s years of valuable, sustainable use that would otherwise be lost in traditional recycling streams. By extending battery life, we not only reduce demand for new materials but also dramatically cut down the carbon footprint associated with manufacturing.
The Reverse Logistics Revolution
Central to this sustainable model is the development of efficient reverse logistics for lithium-ion batteries. Unlike traditional supply chains that flow in a single direction—from manufacturer to consumer—reverse logistics creates a two-way street. It ensures that batteries, once retired, find their way back into the value chain through reuse, remanufacturing, or material recovery.
At LOHUM, we've built one of the most advanced and scalable reverse logistics networks in South Asia, enabling seamless collection, diagnosis, sorting, and repurposing of end-of-life batteries. This infrastructure is key to managing the growing influx of retired batteries as EV adoption accelerates.
Why does reverse logistics matter?
Environmental Impact: Proper logistics ensure batteries don’t end up in landfills, where they pose a serious ecological threat.
Resource Efficiency: It enables recovery of valuable materials and avoids the environmental damage caused by mining.
Economic Value: It provides manufacturers and consumers a reliable, cost-effective way to manage battery lifecycles, while creating circular revenue streams.
The Science Behind Sustainable Battery Recycling
While repurposing offers a powerful bridge to a second life, batteries will eventually need to be recycled. Traditional pyrometallurgical recycling techniques—essentially high-heat smelting—recover some materials like cobalt and nickel but at a high environmental cost and low lithium recovery rates. These processes also generate toxic emissions and are energy-intensive.
LOHUM is innovating beyond these limitations. Our advanced hydrometallurgical processes and material re-refinement systems allow for the recovery of lithium, cobalt, nickel, and manganese with high purity and significantly lower emissions. Additionally, we are actively exploring direct recycling techniques where cathode compounds are rejuvenated without breaking them down entirely—preserving material value and reducing reprocessing energy.
New research even suggests that cathode materials from recycled batteries can outperform virgin cathodes. Increased porosity, improved lithium-ion flow, and reduced microcracking all contribute to longer cycle life and faster charging—turning yesterday’s batteries into tomorrow’s performance stars.
Policy Momentum & Global Responsibility
Forward-looking governments are recognizing the critical role battery recycling will play in achieving climate targets. California, for instance, is working to ensure 100% of EV batteries sold in the state are either reused or recycled at end-of-life. The European Union and India are exploring Extended Producer Responsibility (EPR) mandates to ensure accountability and sustainability across the battery value chain.
As one of the few companies delivering integrated battery lifecycle solutions, LOHUM is aligning with this global shift. We are not only recovering materials but also creating a reliable, domestic supply of battery-grade minerals—critical for national energy security and industrial growth.
The Future is Circular—and LOHUM is Leading the Charge
The battery industry is on the cusp of a trillion-dollar revolution. With rising demand for EVs and renewable energy storage, the world needs solutions that are scalable, sustainable, and socially responsible.
At LOHUM, we are proud to be pioneers in this transformation—building a vertically integrated ecosystem that covers everything from reverse logistics and repurposing to responsible recycling and material re-manufacturing. Our work ensures that no battery is wasted, and every gram of material is used to its fullest potential.
Because when batteries live longer, our planet does too.
#critical minerals#lohum#battery waste management#lithium battery reusing and recycling#li-ion battery waste management#3 wheeler ev battery#reverse logistics for lithium-ion batteries#lithium battery waste recycling
0 notes
Text
How to set up an EMR studio in AWS? Standards for EMR Studio

To ensure users can access and use the environment properly, Amazon EMR Studio setup involves many steps. Once you meet prerequisites, the process begins.
Setting up an EMR studio
Setup requirements for EMR Studio Before setting up, you need:
An AWS account
Establishing and running an EMR Studio.
A dedicated Amazon S3 bucket for EMR Studio notebook and workspace backups.
Five subnets and an Amazon VPC are recommended for Git repositories and connecting to Amazon EMR on EC2 or EKS clusters. EMR Studio works with EMR Serverless without VPC.
Setup steps Setup often involves these steps:
Choose an Authentication Mode: Choose IAM Identity Centre or IAM for your studio. User and permission management is affected by this decision. AWS IAM authenticates and IAM Identity Centre stores identities. Like IAM authentication or federation, IAM mode is compatible with many identity providers and straightforward to set up for identity management. IAM Identity Centre mode simplifies user and group assignment for Amazon EMR and AWS beginners. SAML 2.0 and Microsoft Active Directory integration simplifies multi-account federation.
Create the EMR Studio Service Role: An EMR Studio needs an IAM service role to create a secure network channel between Workspaces and clusters, store notebook files in Amazon S3, and access AWS Secrets Manager for Git repositories. This service role should describe all Amazon S3 notebook storage and AWS Secrets Manager Git repository access rights.
This role requires a trust policy from AWS to allow elasticmapreduce.amazonaws.com to play:AWS:SourceArn and SourceAccount settings for confused deputy prevention. After trust policy creation, you link an IAM permissions policy to the role. This policy must include permissions for Amazon EC2 tag-based access control and specific S3 read/write operations for your assigned S3 bucket. If your S3 bucket is encrypted, you need AWS KMS permissions. Some policy claims concerning tagging network interfaces and default security groups must remain unaltered for the service role to work.
Set EMR Studio user permissions: Set up user access policies to fine-tune Studio user access.
Create an EMR Studio user role to leverage IAM Identity Centre authentication. Sts:SetContext and AssumeRole allow elasticmapreduce.amazonaws.com to assume this role's trust relationship policy. You assign EMR Studio session policies to this user role before assigning users. Session policies provide Studio users fine-grained rights like creating new EMR clusters. The final permissions of a user depend on their session policy and EMR Studio user role. If a person belongs to multiple Studio groups, their permissions are a mix of group policies.
IAM authentication mode grants studio access via ABAC and IAM permissions policies. Allowing elasticmapreduce:CreateStudioPresignedUrl in a user's IAM permissions policy lets you use ARN or ABAC tags to limit the user to a Studio.
You specify one or more IAM permissions policies to describe user behaviours regardless of authentication mode. Workspace creation, cluster attachment and detachment, Git repository management, and cluster formation are basic, intermediate, and advanced rules with different authority. Clusters set data access control rights, not Studio user permissions.
(Optional) Create custom security groups to handle EMR Studio network traffic. If no custom security groups are selected, Studio uses defaults. When using custom security groups, specify a Workspace security group for outgoing access to clusters and Git repositories and an engine security group for inbound access.
Create an EMR Studio using the AWS CLI or Amazon EMR console. The interface creates an EMR Serverless application and offers simple configurations for interactive or batch workloads. ‘Custom’ gives full control over settings. Custom parameters include studio name, S3 location, workspace count, IAM or IAM Identity Centre authentication, VPC, subnets, and security groups. IAM authentication for federated users can include an IdP login URL and RelayState parameter name.
You must select EMR Studio Service and User Roles for IAM Identity Centre authentication. For speedier sign-on, enable trusted identity propagation. The AWS CLI tool create-studio requires programmatic creation options based on authentication method.
After building an EMR Studio, you may assign users and groups. Approach depends on authentication mode.
In IAM authentication mode, user assignment and permissions may require your identity provider. Limiting Studio access with ARN or ABAC tags and configuring the user's IAM rights policy to allow CreateStudioPresignedUrl does this.
The AWS CLI or Amazon EMR administration console can handle IAM Identity Centre authentication mode users. The console lets you assign users or groups from the Identity Centre directory. The AWS CLI command create-studio-session-mapping requires the Studio ID, identity name, identity type (USER or GROUP), and ARN of the session policy to associate. At assignment, you set a session policy. Altering the session policy lets you adjust user permissions later.
#EMRstudio#EMRStudioServiceRole#AmazonS3#AWSSecretsManageraccess#SecurityGroups#AmazonEMR#IdentityCentreauthenticationmode#technology#technews#technologynews#news#govindhtech
0 notes
Text
A3 - Development Progress
A few weeks ago, we were tasked to create groups and work on a chosen game proposed by one of our members. The game unanimously chosen by our team is named:
"The Skull Cries"
This is a roguelike top-down shooter where the player tries to get past waves of monsters.

(Sell sheet image provided by Luca, one of my groupmates)
The team had started fixing a few bugs to ensure the gameplay itself is ready for playtesting. I focused on refactoring and reorganising the GDevelop events to make it easier for our development team to tweak values and game balance. Luca added a tutorial and main menu sequence to the game as well. Additionally, we found out that playing up to the 11th wave started lagging the game by a huge amount. This was apparently caused by the number of bullets and enemies existing in the scene. The bullets were not despawning after exiting the view and the slimes just kept repeatedly spawning instantly. To fix this, I added logic to despawn the bullet when it exits the screen and tweaked the spawning formula to have the slime spawn interval decrease at a slower rate (and not reaching 0).
Since we worked in separate machines, we had to find a way to sync up the work. We had previously set up a GitHub repository for this project. Luckily GDevelop had an option to save the game project files into multiple JSON files to separate external events and scene events as opposed to storing them into one large JSON. It seemed pretty straight forward at first until we had to combine both of our works.
At some point during the repository pushing and pulling, some scenes (although existed in the game project files) were missing from the editor interface. Me and Luca quickly skimmed through the main JSON file and found that all we had to do was add in the scene event references to the main JSON. This was fixed and we could finally see the scenes in the editor.

HOWEVER, all of the sprites used in those scenes appeared as default icons (aside from the global objects). We started to panic a little as we had no idea what was happening at the time. Eventually, we figured out the problem:
The main JSON file also stored references to the sprite assets... and this was not updated.
We only had 2 choices:
revert to a previous version of the project which we could not do since for some reason, the backup project was overwritten by GitHub and the main JSON containing all the new asset references was missing.
So, we went with the second option, reapplying all of the sprites to each game object in the editor. This took painfully long but we eventually reestablished all references to the object sprites and animations.
This was a good learning experience where I learned that keeping backups separate from the GitHub repository would do good down the line in case things messed up.
Next time, the team will focus on having the game playtested so we can see if it fits our prospected player experience.
1 note
·
View note
Text
Key Trends in Document Digitization Software to Watch in 2025

As the world embraces remote work, cloud technology, and paperless operations, the demand for document digitization software continues to skyrocket. From small businesses to large enterprises, organizations are shifting away from traditional filing systems and investing in tools that not only digitize paper documents but also automate, organize, and secure them.
With 2025 on the horizon, the landscape of document digitization software is evolving rapidly. Here are the key trends that are shaping the future of document management and digital transformation.
1. AI and Machine Learning Are Revolutionizing Data Capture
One of the most significant developments in document digitization software is the integration of artificial intelligence (AI) and machine learning (ML). These technologies allow systems to go beyond simple scanning and optical character recognition (OCR).
Now, AI-powered tools can:
Auto-classify documents based on content
Detect errors or anomalies in scanned data
Extract structured data from unstructured formats
Improve accuracy over time through learning algorithms
This reduces the need for manual data entry and speeds up document processing, especially in industries like banking, legal, and healthcare.
2. Cloud-Based Digitization Is Becoming the Norm
With the rise of hybrid and remote work models, cloud-based document digitization software is no longer a luxury—it's a necessity. Organizations are moving away from on-premise setups and opting for cloud platforms that offer:
Real-time access from anywhere
Automatic software updates
Scalable storage solutions
Built-in backup and disaster recovery features
Cloud-native systems also allow easier collaboration across departments and geographies, making workflows more agile and integrated.
3. Focus on Data Security and Compliance
As digital document repositories grow, so do the risks associated with unauthorized access, data breaches, and non-compliance. In 2025, security will be a core component of any serious document digitization software.
Key features in demand include:
End-to-end encryption
Role-based access controls
Audit trails and activity logs
Compliance support for regulations like GDPR, HIPAA, and SOC 2
Vendors are increasingly offering compliance-specific solutions tailored to industries such as healthcare, finance, and government.
4. Seamless Integration with Business Applications
Gone are the days when document management existed in isolation. The best document digitization software in 2025 will offer deep integrations with CRM, ERP, HRMS, and other enterprise tools.
For example, a digitized invoice can be automatically routed to an accounts payable system, or a client contract can sync directly with a CRM. This integration creates a unified digital workspace and eliminates bottlenecks caused by siloed systems.
5. Mobile-First Document Digitization
With smartphones and tablets becoming everyday business tools, mobile compatibility is a top priority. Modern document digitization software now includes mobile apps that allow users to:
Scan documents using phone cameras
Upload and access files on the go
Approve workflows and tasks from mobile devices
This flexibility ensures that digitization and document access aren’t confined to desktop environments.
6. Enhanced User Experience and Low-Code Platforms
User-friendly interfaces are no longer optional. Developers are focusing on intuitive UI/UX design and providing low-code or no-code options for setting up automation rules, workflows, and templates.
This democratizes the digitization process, allowing non-technical users to customize the software to their needs without IT intervention.
Conclusion
As businesses continue to embrace digital transformation, document digitization software is evolving into a smarter, more integrated, and secure solution. In 2025, organizations that stay ahead of these trends—AI-powered automation, cloud-based access, tight security, seamless integration, mobile functionality, and user-friendly platforms—will not only streamline their operations but also gain a competitive edge.
If your organization is still relying on traditional document handling, now is the time to explore the cutting-edge features offered by modern document digitization software. The future of efficient, secure, and intelligent document management is already here.
0 notes
Text
Unix Commands Every iOS Developer Should Know
When developing iOS applications, many developers focus primarily on Swift, Objective-C, and Xcode. However, a lesser-known yet powerful toolset that enhances productivity is Unix commands. Since macOS is a Unix-based operating system, understanding essential Unix commands can help iOS developers manage files, automate tasks, debug issues, and optimize workflows.
In this article, we’ll explore some of the most useful Unix commands every iOS developer should know.
Why Should iOS Developers Learn Unix?
Apple’s macOS is built on a Unix foundation, meaning that many system-level tasks can be efficiently handled using the terminal. Whether it’s managing files, running scripts, or automating processes, Unix commands can significantly enhance an iOS developer’s workflow. Some benefits include:
Better control over project files using the command line
Efficient debugging and log analysis
Automating repetitive tasks through scripting
Faster project setup and dependency management
Now, let’s dive into the must-know Unix commands for iOS development.
1. Navigating the File System
cd – Change Directory
The cd command allows developers to navigate between directories
{cd ~/Documents/MyiOSProject}
This moves you into the MyiOSProject folder inside Documents.
ls – List Directory Contents
To view files and folders in the current directory:
bash
CopyEdit
ls
To display detailed information, use:
bash
CopyEdit
ls -la
pwd – Print Working Directory
If you ever need to check your current directory:
bash
CopyEdit
pwd
2. Managing Files and Directories
mkdir – Create a New Directory
To create a new folder inside your project:
bash
CopyEdit
mkdir Assets
rm – Remove Files or Directories
To delete a file:
bash
CopyEdit
rm old_file.txt
To delete a folder and its contents:
bash
CopyEdit
rm -rf OldProject
⚠ Warning: The -rf flag permanently deletes files without confirmation.
cp – Copy Files or Directories
To copy a file from one location to another:
bash
CopyEdit
cp file.txt Backup/
To copy an entire folder:
bash
CopyEdit
cp -r Assets Assets_Backup
mv – Move or Rename Files
Rename a file:
bash
CopyEdit
mv old_name.txt new_name.txt
Move a file to another directory:
bash
CopyEdit
mv file.txt Documents/
3. Viewing and Editing Files
cat – Display File Contents
To quickly view a file’s content:
bash
CopyEdit
cat README.md
nano – Edit Files in Terminal
To open a file for editing:
bash
CopyEdit
nano config.json
Use Ctrl + X to exit and save changes.
grep – Search for Text in Files
To search for a specific word inside files:
bash
CopyEdit
grep "error" logs.txt
To search recursively in all files within a directory:
bash
CopyEdit
grep -r "TODO" .
4. Process and System Management
ps – Check Running Processes
To view running processes:
bash
CopyEdit
ps aux
kill – Terminate a Process
To kill a specific process, find its Process ID (PID) and use:
bash
CopyEdit
kill PID
For example, if Xcode is unresponsive, find its PID using:
bash
CopyEdit
ps aux | grep Xcode kill 1234 # Replace 1234 with the actual PID
top – Monitor System Performance
To check CPU and memory usage:
bash
CopyEdit
top
5. Automating Tasks with Unix Commands
chmod – Modify File Permissions
If a script isn’t executable, change its permissions:
bash
CopyEdit
chmod +x script.sh
crontab – Schedule Automated Tasks
To schedule a script to run every day at midnight:
bash
CopyEdit
crontab -e
Then add:
bash
CopyEdit
0 0 * * * /path/to/script.sh
find – Search for Files
To locate a file inside a project directory:
bash
CopyEdit
find . -name "Main.swift"
6. Git and Version Control with Unix Commands
Most iOS projects use Git for version control. Here are some useful Git commands:
Initialize a Git Repository
bash
CopyEdit
git init
Clone a Repository
bash
CopyEdit
git clone https://github.com/user/repo.git
Check Status and Commit Changes
bash
CopyEdit
git status git add . git commit -m "Initial commit"
Push Changes to a Repository
bash
CopyEdit
git push origin main
Final Thoughts
Mastering Unix commands can greatly improve an iOS developer’s efficiency, allowing them to navigate projects faster, automate tasks, and debug applications effectively. Whether you’re managing files, monitoring system performance, or using Git, the command line is an essential tool for every iOS developer.
If you're looking to hire iOS developers with deep technical expertise, partnering with an experienced iOS app development company can streamline your project and ensure high-quality development.
Want expert iOS development services? Hire iOS Developers today and build next-level apps!
#ios app developers#Innvonixios app development company#ios app development#hire ios developer#iphone app development#iphone application development
0 notes
Text
Steps to automate schema changes and data pipeline deployments with GitHub or Azure DevOps.

Managing database schema changes and automating data pipeline deployments is critical for ensuring consistency, reducing errors, and improving efficiency. This guide outlines the steps to achieve automation using GitHub Actions or Azure DevOps Pipelines.
Step 1: Version Control Your Schema and Pipeline Code
Store database schema definitions (SQL scripts, DB migration files) in a Git repository.
Keep data pipeline configurations (e.g., Terraform, Azure Data Factory JSON files) in version control.
Use branching strategies (e.g., feature branches, GitFlow) to manage changes safely.
Step 2: Automate Schema Changes (Database CI/CD)
To manage schema changes, you can use Flyway, Liquibase, or Alembic.
For Azure SQL Database or PostgreSQL (Example with Flyway)
Store migration scripts in a folder:
pgsql
├── db-migrations/ │ ├── V1__init.sql │ ├── V2__add_column.sql
Create a GitHub Actions workflow (.github/workflows/db-migrations.yml):
yaml
name: Deploy Database Migrations on: [push] jobs: deploy: runs-on: ubuntu-latest steps: - name: Checkout code uses: actions/checkout@v3 - name: Install Flyway run: curl -L https://repo1.maven.org/maven2/org/flywaydb/flyway-commandline/9.0.0/flyway-commandline-9.0.0-linux-x64.tar.gz | tar xvz && mv flyway-*/flyway /usr/local/bin/ - name: Apply migrations run: | flyway -url=jdbc:sqlserver://$DB_SERVER -user=$DB_USER -password=$DB_PASS migrate
In Azure DevOps, you can achieve the same using a YAML pipeline:
yaml
trigger: branches: include: - main pool: vmImage: 'ubuntu-latest' steps: - checkout: self - script: | flyway -url=jdbc:sqlserver://$(DB_SERVER) -user=$(DB_USER) -password=$(DB_PASS) migrate
Step 3: Automate Data Pipeline Deployment
For Azure Data Factory (ADF) or Snowflake, deploy pipeline definitions stored in JSON files.
For Azure Data Factory (ADF)
Export ADF pipeline JSON definitions into a repository.
Use Azure DevOps Pipelines to deploy changes:
yaml
trigger: branches: include: - main pool: vmImage: 'ubuntu-latest' steps: - task: AzureResourceManagerTemplateDeployment@3 inputs: deploymentScope: 'Resource Group' azureSubscription: 'AzureConnection' resourceGroupName: 'my-rg' location: 'East US' templateLocation: 'Linked artifact' csmFile: 'adf/pipeline.json'
For GitHub Actions, you can use the Azure CLI to deploy ADF pipelines:
yaml
steps: - name: Deploy ADF Pipeline run: | az datafactory pipeline create --factory-name my-adf --resource-group my-rg --name my-pipeline --properties @adf/pipeline.json
Step 4: Implement Approval and Rollback Mechanisms
Use GitHub Actions Environments or Azure DevOps approvals to control releases.
Store backups of previous schema versions to roll back changes.
Use feature flags to enable/disable new pipeline features without disrupting production.
Conclusion
By using GitHub Actions or Azure DevOps, you can automate schema changes and data pipeline deployments efficiently, ensuring faster, safer, and more consistent deployments.
WEBSITE: https://www.ficusoft.in/snowflake-training-in-chennai/
0 notes